

在这个信息爆炸的时代,拥有一个能够迅速传达信息、展示个性、并能够与世界互动的在线平台,已成为企业和个人的基本需求。WordPress,以其无与伦比的易用性和强大的扩展性,成为了构建此类平台的首选工具。而LNMP,这个由Linux、Nginx、MySQL和PHP组成的强大组合,为WordPress提供了一个稳定而高效的运行环境。本文将带您走进搭建WordPress站点的奇妙旅程,从0开始,利用LNMP的强大功能,打造一个既充满个性又能满足业务需求的在线家园。
LNMP项目实战环境说明
L:Linux(CentOS7)https://mirrors.aliyun.com/centos/7/isos/x86_64/
N:Nginx(1.18.0) https://nginx.org/en/download.html
M:MySQL(8.0.19) https://dev.mysql.com/downloads/mysql/
P:PHP(7.4.10) http://php.net/downloads.php
Wordpress(5.4.2):https://cn.wordpress.org/download/
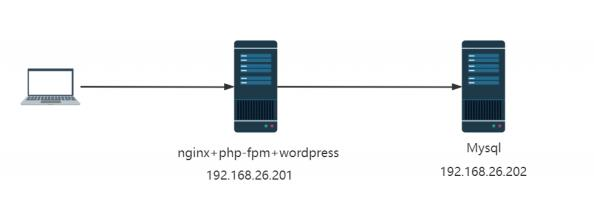
#部署规划:
192.168.26.201:Nginx php-fpm 运行web服务
192.168.26.202:运行MySQL数据库
在192.168.26.202主机部署MySQL服务
1  [root@mariadb ~]# yum -y install mariadb-server
2  [root@mariadb ~]# systemctl enable --now mariadb.service
[root@mariadb ~]# mysql

Welcome to the MariaDB monitor.  Commands end with ; or \g.

Your MariaDB connection id is 2

Server version: 5.5.68-MariaDB MariaDB Server
Copyright (c) 2000, 2018, Oracle, MariaDB Corporation Ab and others.
Type 'help;' or '\h' for help. Type '\c' to clear the current input statement.
MariaDB [(none)]> create database wordpress;
Query OK, 1 row affected (0.00 sec)
 MariaDB [(none)]> create user wordpress@'192.168.26.%' identified by '123456';

Query OK, 0 rows affected (0.00 sec)
MariaDB [(none)]> grant all on wordpress.* to wordpress@'192.168.26.%';

Query OK, 0 rows affected (0.00 sec) 18

MariaDB [(none)]>
在WordPress服务器使用授权的MySQL账户远程登录测试权限
[root@web ~]# mysql -uwordpress -p123456 -h192.168.26.202
Type 'help;' or '\h' for help. Type '\c' to clear the current input statement.
+--------------------+
| Database            |
+--------------------+
| information_schema |
| test                 |
| wordpress          |
+--------------------+
3 rows in set (0.00 sec)
在192.168.26.201主机部署php-fpm服务
https://www.php.net/downloads.php
[root@centos7 ~]# yum -y install gcc openssl-devel libxml2-devel bzip2-devel libmcrypt-devel sqlite-devel oniguruma-devel

[root@centos7 ~]#cd /usr/local/src

[root@centos7 src]#wget https://www.php.net/distributions/php-7.4.11.tar.xz
[root@web src]# tar xf php-7.4.11.tar.xz

[root@web src]# ls

nginx-1.22.0  nginx-1.22.0.tar.gz  php-7.4.11  php-7.4.11.tar.xz

[root@web src]# cd php-7.4.11/

[root@centos7 php-7.4.11]# ./configure --prefix=/usr/local/php74 --enable- mysqlnd --with-mysqli=mysqlnd --with-pdo-mysql=mysqlnd --with-openssl --with-zlib --with-config-file-path=/etc --with-config-file-scan-dir=/etc/php.d --enable-mbstring --enable-xml --enable-sockets --enable-fpm --enable-maintainer-zts --disable-fileinfo
......

config.status: creating main/php_config.h
config.status: executing default commands

+--------------------------------------------------------------------+

| License:                                                               |
| This software is subject to the PHP License, available in this      |

| distribution in the file LICENSE. By continuing this installation |

| process, you are bound by the terms of this license agreement.      |

| If you do not agree with the terms of this license, you must abort |

| the installation process at this point.                            |

 +--------------------------------------------------------------------+

Thank you for using PHP.

[root@centos7 php-7.4.11]#make -j 8 && make install
#生成配置文件
[root@centos7 php-7.4.11]#cp /usr/local/src/php-7.4.11/php.ini-production /etc/php.ini
[root@web php-7.4.11]# cd /usr/local/php74/etc/
[root@web etc]# cp php-fpm.conf.default php-fpm.conf
 [root@web etc]# pwd
/usr/local/php74/etc
[root@web etc]# cd php-fpm.d/
[root@web php-fpm.d]# cp www.conf.default www.conf
 [root@web php-fpm.d]# vim www.conf
[root@centos7 php-fpm.d]#grep '^[^;]' www.conf
 [www]
user = nginx
 group = nginx
listen = 127.0.0.1:9000
pm = dynamic
pm.max_children = 5
 pm.start_servers = 2
pm.min_spare_servers = 1
pm.max_spare_servers = 3
pm.status_path = /pm_status
ping.path = /ping
[root@web php-fpm.d]# /usr/local/php74/sbin/php-fpm -t
[01-Aug-2022 19:44:33] NOTICE: configuration file /usr/local/php74/etc/php- fpm.conf test is successful
[root@web php-fpm.d]# /usr/local/php74/sbin/php-fpm
[root@web php-fpm.d]# ss -ntl
State Recv-Q Send-Q Local Address:Port

Peer Address:Port

LISTEN 0 100 127.0.0.1:25

*:*

LISTEN 0 128 127.0.0.1:9000

*:*

LISTEN 0 128 *:22

*:*

LISTEN 0 100 [::1]:25

[::]:*
LISTEN 0 128 [::]:22

[::]:*

[root@web php-fpm.d]#

[root@web php-fpm.d]# pstree -p |grep php

|-php-fpm(14119)-+-php-fpm(14120)

| `-php-fpm(14121)

[root@web php-fpm.d]# ps -ef |grep php

root 14119 1 0 19:45 ? 00:00:00 php-fpm: master process

(/usr/local/php74/etc/php-fpm.conf)

nobody 14120 14119 0 19:45 ? 00:00:00 php-fpm: pool www

nobody 14121 14119 0 19:45 ? 00:00:00 php-fpm: pool www

root 14134 35079 0 19:46 pts/2 00:00:00 grep --color=auto php
在192.168.26.201主机部署nginx服务
1   [root@db1 ~]# vim install_nginx.sh

#!/bin/bash

# 安装必要的编译依赖

yum install -y gcc-c++ pcre-devel zlib-devel make
# 下载Nginx源码包

wget http://nginx.org/download/nginx-1.22.0.tar.gz

tar zxvf nginx-1.22.0.tar.gz

cd nginx-1.22.0

# 配置编译选项,这里只列出了一部分常用选项

./configure --prefix=/usr/local/nginx --with-http_ssl_module

# 编译和安装

make && make install

# 启动Nginx

/usr/local/nginx/sbin/nginx

2   [root@db1 ~]# /bin/bash install_nginx.sh

  3   [root@db1 ~]# ss -ntl | grep 80

LISTEN     0      128          *:80                       *:*
LISTEN     0      128          *:8080                     *:*
LISTEN     0      80        [::]:3306                  [::]:*
LISTEN     0      128       [::]:80                    [::]:*
LISTEN     0      128       [::]:8080                  [::]:*
[root@web ~]#vim /usr/local/nginx/conf/nginx.conf

[root@web ~]#grep -Ev '#|^$' vim /usr/local/nginx/conf/nginx.conf
 worker_processes  1;

events {

worker_connections  1024;

}

http {
include       mime.types;
default_type  application/octet-stream;

sendfile        on;

keepalive_timeout  65;
server {

listen       80;

server_name  localhost;

location / {

root   html;

index  index.php index.html index.htm;

}

error_page   500 502 503 504  /50x.html;

location = /50x.html { root   html;

}

location ~ \.php$ {

root           html;

fastcgi_pass   127.0.0.1:9000;

fastcgi_index  index.php;
fastcgi_param  SCRIPT_FILENAME $document_root$fastcgi_script_name;

include        fastcgi_params;
          }

}
 }
 [root@web ~]# /usr/local/nginx/sbin/nginx
在192.168.26.201主机部署 wordpress
[root@web ~]# wget https://cn.wordpress.org/wordpress-6.0.1-zh_CN.tar.gz
[root@web ~]# tar xf wordpress-6.0.1-zh_CN.tar.gz
[root@web ~]#cp -r wordpress/* /usr/local/nginx/html
[root@web html]# cp wp-config-sample.php wp-config.php
[root@web html]# vim wp-config.php
define( 'DB_NAME', 'wordpress' );
/** Database username */
define( 'DB_USER', 'wordpress' );
/** Database password */
define( 'DB_PASSWORD', '123456' );
/** Database hostname */
define( 'DB_HOST', '192.168.26.202' );
[root@web html]# chown -R nginx.nginx .
打开浏览器访问下面链接
192.168.26.201
#可以看到上传的图片
[[root@web html]# tree wp-content/uploads/
wp-content/uploads/ └── 2022
└── 08
└── 1.png
2 directories, 1 file
#注意:默认只支持1M以下文件上传 ,要利用php程序上传大图片 ,还需要修改下面三项配置 ,最大上传由 三项值的最小值决定
#直接上传大于1M文件 ,会出现下面413错误
[root@centos7 ~]#tail -f /apps/nginx/logs/access.log
10.0.0.1 - - [27/Nov/2020:12:21:16 +0800] "POST /wp-admin/async-upload.php
HTTP/1.1" 413 585 "http://10.0.0.7/wp-admin/upload.php" "Mozilla/5.0
(Windows NT
10.0; Win64; x64) AppleWebKit/537.36 (KHTML, like Gecko) Chrome/87.0.4280.67
Safari/537.36 Edg/87.0.664.47"
#nginx上传文件大小限制
[root@centos7 ~]#vim /apps/nginx/conf/nginx.conf
server {
client_max_body_size 10m; #默认值为1M
.....
#php上传文件大小限制
[root@centos7 ~]#vim /etc/php.ini
post_max_size = 30M   #默认值为8M
upload_max_filesize = 20M  #默认值为2M
[root@centos7 ~]#systemctl restart nginx php-fpm
以上就是本期的全部内容。大家好,我是乐乐专注IT运维技术研究与分享,更多运维技巧欢迎关注乐维社区,更多运维问题也欢迎到乐维社区留言提问。