

cd /usr/lib/systemd/system vi nginx.service
[Unit]

Description=nginx

After=network.target

[Service]

Type=forking

ExecStart=/usr/local/nginx/sbin/nginx

ExecReload=/usr/local/nginx/sbin/nginx -s reload ExecStop=/usr/local/nginx/sbin/nginx -s quit

PrivateTmp=true

[Install]

WantedBy=multi-user.target
[Unit]:服务的说明
Description:描述服务

After:描述服务类别

[Service]服务运行参数的设置

Type=forking是后台运行的形式 ExecStart为服务的具体运行命令 ExecReload为重启命令

ExecStop为停止命令

PrivateTmp=True表示给服务分配独立的临时空间

[Install]运行级别下服务安装的相关设置,可设置为多用户,即系统运行级别为3
nginx [-?hvVtTq] [-s signal] [-c filename] [-p prefix] [-g directives]
帮助: -? -h
使用指定的配置文件: -c 指定配置指令:-g

指定运行目录:-p

测试配置文件是否有语法错误:-t -T

打印nginx的版本信息、编译信息等:-v -V

发送信号: -s 示例: nginx -s reload
1  立刻停止服务:stop,相当于信号SIGTERM,SIGINT

2  优雅的停止服务:quit,相当于信号SIGQUIT

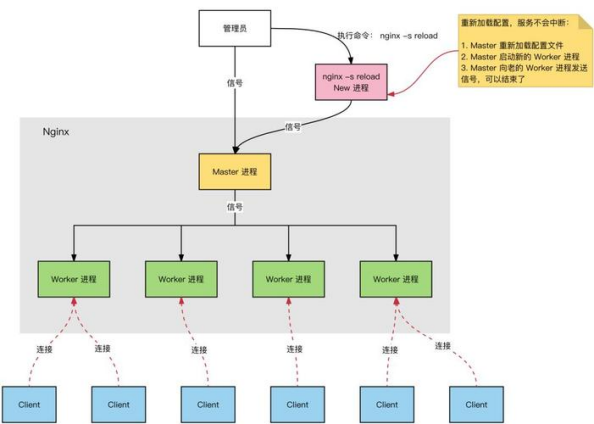
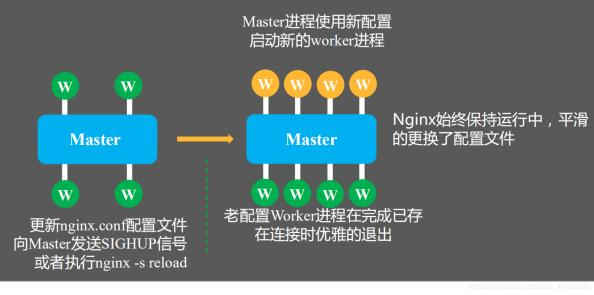
3  平滑重启,重新加载配置文件: reload,相当于信号SIGHUP

4  重新开始记录日志文件:reopen,相当于信号SIGUSR1,在切割日志时用途较大

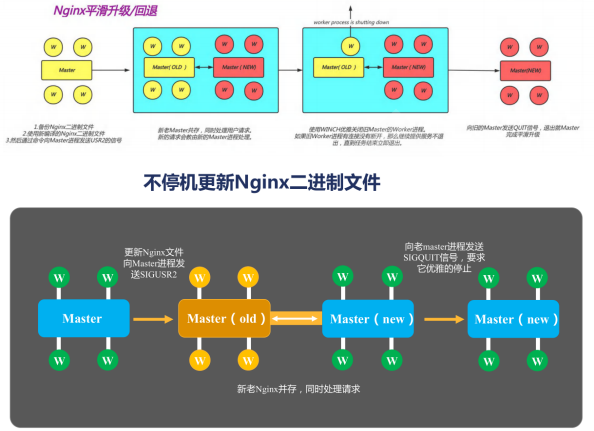
5  平滑升级可执行程序:发送信号SIGUSR2,在升级版本时使用

6  优雅的停止工作进程:发送信号SIGWINCH,在升级版本时使用
[root@server3 ~]# ls /usr/local/nginx/logs/ access.log  error.log  nginx.pid
[root@server3 ~]# cd /usr/local/nginx/logs/ [root@server3 logs]# ls

access.log  error.log  nginx.pid

[root@server3 logs]# mv access.log access.log-20220722 [root@server3 logs]# ls

access.log-20220722  error.log  nginx.pid [root@server3 logs]# touch access.log

[root@server3 logs]# ls

access.log  access.log-20220722  error.log  nginx.pid [root@server3 logs]# chown nginx.nginx access.log

[root@server3 logs]# tail -f access.log

##访问,观察日志,没有记录下来,但是查看刚才改名的日志文件 [root@zhong logs]# tail access.log-20220722

##发现访问的时候, 日志依然记录到旧的文件中去

[root@zhong logs]# nginx -s reopen   ##等价于下面命令

[root@zhong logs]# kill -USR1 `cat /usr/local/nginx/logs/nginx.pid`
[root@server3 ~]# cd /usr/local/nginx/html/ [root@server3 html]# ls
50x.html  index.html
[root@server3 html]# dd if=/dev/zero of=a.img bs=2M count=1024
1024+0 records in  1024+0 records out
2147483648 bytes (2.1 GB) copied, 6.37415 s, 337 MB/s
##客户端下载
[root@client ~]# wget http://192.168.26.203/a.img
 --2021-10-26 23:17:07--  http://192.168.26.201/a.img
Connecting to 192.168.26.201:80... connected.
HTTP request sent, awaiting response... 200 OK
Length: 2147483648 (2.0G) [application/octet-stream]
Saving to: ‘a.img ’ 19
a.img                      100%[=======================================>] 2.00G   243MB/s    in 14s

2021-10-26 23:17:21 (147 MB/s) - ‘a.img ’ saved [2147483648/2147483648]
[root@client ~]#

##服务器查看,发现在没有下载完毕的时候进程依然存在,客户端下载完毕后,服务器端进程也退出了
 [root@zhong html]# nginx -s quit
[root@zhong html]# ss -nt
State       Recv-Q Send-Q        Local Address:Port Peer Address:Port
ESTAB       0      52           192.168.26.201:22
192.168.26.1:65469              1
ESTAB       0      2606400       192.168.26.201:80
192.168.26.11:38804
[root@zhong html]# ss -nt
State       Recv-Q Send-Q        Local Address:Port Peer Address:Port
ESTAB       0      52           192.168.26.201:22
192.168.26.1:65469
ESTAB       0      2801880       192.168.26.201:80
192.168.26.11:38804
[root@zhong html]# ss -nt
State       Recv-Q Send-Q        Local Address:Port Peer Address:Port
ESTAB       0      52           192.168.26.201:22
192.168.26.1:65469


[root@zhong ~]# vim /usr/local/nginx/conf/nginx.conf worker_processes  2;
[root@server3 ~]# /usr/local/nginx/sbin/nginx -s reload [root@server3 ~]# ps -axuf | grep nginx
root       5717  0.0  0.0 112812   976 pts/0    S+   10:59   0:00
\_ grep --color=auto nginx
root       5553  0.0  0.1  77424  2176 ?        Ss   10:48   0:00 nginx:
master process /usr/local/nginx/sbin/nginx
nginx      5714  0.0  0.1  77860  2264 ?        S    10:59   0:00  \_
nginx: worker process
nginx      5715  0.0  0.1  77860  2264 ?        S    10:59   0:00  \_
nginx: worker process
[root@server3 ~]#
#下载最新稳定版
[root@zhong ~]# wget http://nginx.org/download/nginx-1.22.0.tar.gz 14  [root@zhong ~]# tar xvf nginx-1.22.0.tar.gz
[root@zhong ~]# cd nginx-1.22.0
#查看当前使用的版本及编译选项。结果如下:
[root@centos7 ~]# /usr/local/nginx/sbin/nginx -V
nginx version: nginx/1.20.2
built by gcc 4.8.5 20150623 (Red Hat 4.8.5-44) (GCC)
built with OpenSSL 1.0.2k-fips  26 Jan 2017
TLS SNI support enabled
configure arguments: --prefix=/usr/local/nginx --lock-
path=/usr/local/nginx/nginx.lock --user=nginx --group=nginx --with-
http_ssl_module --with-http_flv_module --with-http_stub_status_module -- with-http_gzip_static_module --http-client-body-temp-
path=/usr/local/nginx/client/ --http-proxy-temp-  path=/usr/local/nginx/proxy/ --http-fastcgi-temp-
path=/usr/local/nginx/fcgi/ --http-uwsgi-temp-path=/usr/local/nginx/uwsgi - -http-scgi-temp-path=/usr/local/nginx/scgi --with-pcre --with-file-aio --
with-http_image_filter_module
#configure arguments后面是以前编译时的参数。现在编译使用一样的参数
 [root@centos7 ~]# tar xf nginx-1.22.0.tar.gz
[root@centos7 ~]# ls
anaconda-ks.cfg  nginx-1.20.2.tar.gz  nginx-1.22.0  nginx-1.22.0.tar.gz 31  [root@centos7 ~]# cd nginx-1.22.0/
[root@centos7 nginx-1.22.0]# ./configure --prefix=/usr/local/nginx --lock- path=/usr/local/nginx/nginx.lock --user=nginx --group=nginx --with-
http_ssl_module --with-http_flv_module --with-http_stub_status_module -- with-http_gzip_static_module --http-client-body-temp-
path=/usr/local/nginx/client/ --http-proxy-temp-  path=/usr/local/nginx/proxy/ --http-fastcgi-temp-
path=/usr/local/nginx/fcgi/ --http-uwsgi-temp-path=/usr/local/nginx/uwsgi - -http-scgi-temp-path=/usr/local/nginx/scgi --with-pcre --with-file-aio --
with-http_image_filter_module
#只要make无需要make install
[root@server3 nginx-1.22.0]# make 38  [root@server3 nginx-1.22.0]# ls
auto  CHANGES  CHANGES.ru  conf  configure  contrib  html  LICENSE Makefile  man  objs  README  s rc
[root@centos7 nginx-1.22.0]# objs/nginx -v
nginx version: nginx/1.22.0
#查看两个版本
[root@centos7 nginx-1.22.0]#  ll objs/nginx /usr/local/nginx/sbin/nginx
 -rwxr-xr-x 1 root root 6274992 Jul 22 11:49 objs/nginx
-rwxr-xr-x 1 root root 6262240 Jul 22 11:44 /usr/local/nginx/sbin/nginx
#把之前的旧版的nginx命令备份
[root@server3 nginx-1.22.0]# mkdir /usr/local/nginx/sbin/nginx.old -p
[root@server3 nginx-1.22.0]# mv /usr/local/nginx/sbin/nginx /usr/local/nginx/sbin/nginx.old/
 #把新版本的nginx命令复制过去
[root@server3 nginx-1.22.0]# cp -r objs/nginx /usr/local/nginx/sbin/
#检测一下有没有问题
[root@server3 nginx-1.22.0]# /usr/local/nginx/sbin/nginx -t
nginx: the configuration file /usr/local/nginx/conf/nginx.conf syntax is ok
nginx: configuration file /usr/local/nginx/conf/nginx.conf test is successful
 #USR2 平滑升级可执行程序 ,将存储有旧版本主进程ID的文件重命名为nginx.pid.oldbin,跟着启 动新的nginx
[root@centos7 logs]# cp nginx.pid nginx.pid.old 68
#此时两个master的进程都在运行 ,只是旧的master不在监听 ,由新的master监听80 71
#此时Nginx开启一个新的master进程,这个master进程会生成新的worker进程,这就是升级后的 Nginx进程,此时老的进程不会自动退出,但是当接收到新的请求不作处理而是交给新的进程处理。
[root@server3 logs]# ps -axuf | grep nginx
root       8576  0.0  0.0 112812   976 pts/0    S+   11:06   0:00 \_ grep --color=auto nginx
root       5553  0.0  0.1  77424  2176 ?        Ss   10:48   0:00 nginx: master process /usr/local/nginx/sbin/nginx
nginx      5714  0.0  0.1  77860  2264 ?        S    10:59   0:00  \_ nginx: worker process
nginx      5715  0.0  0.1  77860  2264 ?        S    10:59   0:00  \_ nginx: worker process
[root@centos7 logs]# cat nginx.pid.old 81  6985
[root@server3 logs]# kill -USR2 6985
[root@centos7 logs]# ps -axuf | grep nginx
root       9881  0.0  0.0 112812   980 pts/1    S+   11:53   0:00 \_ grep --color=auto nginx
root       6985  0.0  0.1  77424  2184 ?        Ss   11:44   0:00 nginx: master process /usr/local/nginx/sbin/nginx
nginx      7061  0.0  0.1  77860  2264 ?        S    11:45   0:00  \_ nginx: worker process
nginx      7062  0.0  0.1  77860  2504 ?        S    11:45   0:00  \_ nginx: worker process
root       9877  0.0  0.1  77292  3968 ?        S    11:53   0:00  \_ nginx: master process /usr/local/nginx/sbin/nginx
nginx      9878  0.0  0.1  77748  2144 ?        S    11:53   0:00      \_ nginx: worker process
nginx      9879  0.0  0.1  77748  2144 ?        S    11:53   0:00      \_ nginx: worker process
[root@centos7 logs]# lsof -i :80
COMMAND  PID  USER   FD   TYPE DEVICE SIZE/OFF NODE NAME
nginx   6985  root    6u  IPv4  33185      0t0  TCP *:http (LISTEN)
nginx   7061 nginx    6u  IPv4  33185      0t0  TCP *:http (LISTEN)
nginx   7062 nginx    6u  IPv4  33185      0t0  TCP *:http (LISTEN)
nginx   9877  root    6u  IPv4  33185      0t0  TCP *:http (LISTEN)
nginx   9878 nginx    6u  IPv4  33185      0t0  TCP *:http (LISTEN)
nginx   9879 nginx    6u  IPv4  33185      0t0  TCP *:http (LISTEN) 102
#先关闭旧nginx的worker进程 ,而不关闭nginx主进程方便回滚
#向原Nginx主进程发送WINCH信号,它会逐步关闭旗下的工作进程(主进程不退出),这时所有请求
都会由新版Nginx处理
[root@centos7 logs]# cat nginx.pid.old
6985
[root@zhong nginx-1.20.1]# kill -WINCH 6985
[root@centos7 logs]# kill -WINCH 6985
[root@centos7 logs]# ps -axuf | grep nginx
root      37317  0.0  0.0 112812   980 pts/1    S+   11:56   0:00 \_ grep --color=auto nginx
root       6985  0.0  0.1  77424  2184 ?        Ss   11:44   0:00 nginx: master process /usr/local/nginx/sbin/nginx
root       9877  0.0  0.1  77292  3968 ?        S    11:53   0:00  \_ nginx: master process /usr/local/nginx/sbin/nginx
nginx      9878  0.0  0.1  77748  2144 ?        S    11:53   0:00      \_ nginx: worker process
nginx      9879  0.0  0.1  77748  2144 ?        S    11:53   0:00      \_ nginx: worker process
[root@zhong nginx-1.20.1]#
[root@centos7 logs]# pstree -p | grep nginx
|-nginx(6985)---nginx(9877)-+-nginx(9878)
|                            `-nginx(9879)
[root@centos7 logs]# ps aux | grep nginx
root       6985  0.0  0.1  77424  2184 ?        Ss   11:44   0:00 nginx: master process /usr/local/nginx/sbin/nginx
root       9877  0.0  0.1  77292  3968 ?        S    11:53   0:00 nginx: master process /usr/local/nginx/sbin/nginx
nginx      9878  0.0  0.1  77748  2144 ?        S    11:53   0:00 nginx: worker process
nginx      9879  0.0  0.1  77748  2392 ?        S    11:53   0:00 nginx: worker process
root      37332  0.0  0.0 112812   976 pts/1    S+   11:59   0:00 grep --
color=auto nginx
#经过一段时间测试,新版本服务没问题,最后退出老的master
[root@centos7 logs]# kill -QUIT `cat /usr/local/nginx/logs/nginx.pid.old`
#查看版本是不是已经是新版了
[root@centos7 logs]# /usr/local/nginx/sbin/nginx -v
nginx version: nginx/1.22.0
 [root@centos7 logs]# curl -I 127.0.0.1
HTTP/1.1 200 OK
Server: nginx/1.22.0
Date: Fri, 22 Jul 2022 04:01:55 GMT
Content-Type: text/html
Content-Length: 5
Last-Modified: Fri, 22 Jul 2022 03:45:06 GMT
Connection: keep-alive
ETag: "62da1d42-5"
 Accept-Ranges: bytes
 ##nginx平滑升级后回滚
 ##需要在原主程序未退出前执行回滚操作
 ##如果升级的版本发现问题需要回滚 ,可以重新拉起旧版本的worker
#如果升级的版本发现问题需要回滚 ,可以重新拉起旧版本的worker,如果新版本可用,则不需要
[root@zhong nginx-1.20.1]# kill -HUP `cat
/usr/local/nginx/logs/nginx.pid.old`
[root@zhong nginx-1.20.1]# pstree -p |grep nginx
 |-nginx(8814)-+-nginx(12014)-+-nginx(12015)
 |             |              `-nginx(12016)
 |	|-nginx(12090)
|	`-nginx(12091)
#最后关闭新版的master
[root@zhong nginx-1.20.1]# kill -QUIT `cat /usr/local/nginx/logs/nginx.pid`
错误信息